👨🍳 Recipe: Smoked Chuck Roast
Brisket Vibes Without the Brisket Wait
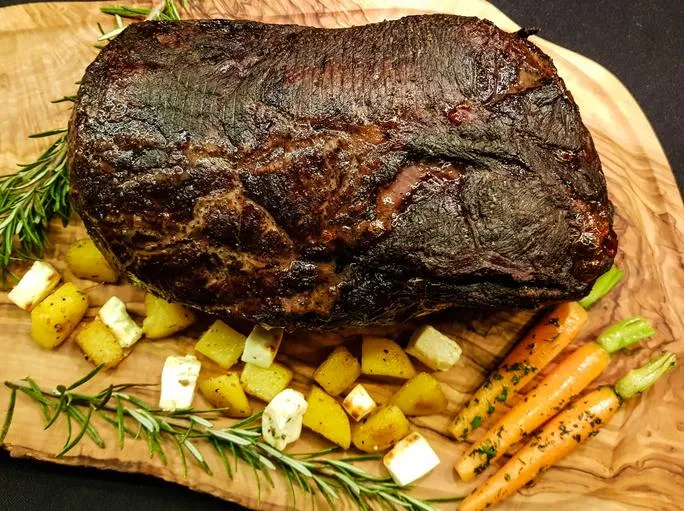
If you’ve ever wished for the smoky, tender magic of brisket without the 12-hour commitment (and without the price tag), let us introduce you to your new best friend: the smoked chuck roast. This cut might not look like much in the meat case, but when you give it the slow-smoke treatment, it transforms into something downright majestic—barky on the outside, buttery on the inside, and loaded with beefy depth.
Smoked chuck roast has been called "Poor Man’s Brisket" and "Weeknight Brisket," but don’t let the name fool you. This isn’t a knock-off—it’s a legit star in its own right. In this guide, we’ll walk you through exactly how to turn this humble cut into smoked gold, from prep to plate.
🥩 Why Chuck Roast?
First, let’s talk about why this cut works so well on the smoker.
Chuck roast comes from the cow’s shoulder—an area that does a lot of work. That means it’s loaded with connective tissue, marbling, and muscle—perfect for low and slow cooking. While it’s traditionally used in pot roasts and braises, the chuck roast also has everything we want in a smoked meat: fat, structure, and serious flavor.
Best of all, chuck roasts are widely available and affordable. You can usually score one for half the price of brisket, and still get that rich, juicy payoff.
🧂 What You’ll Need
Ingredients:
3–4 lb chuck roast
2 tbsp yellow mustard (as a binder)
¼ cup beef rub (equal parts kosher salt, black pepper, garlic powder, with a dash of smoked paprika)
Optional: beef broth or tallow for spritzing
Gear:
Smoker (charcoal, pellet, offset, or electric)
Meat thermometer or digital probe
Butcher paper or aluminum foil
Spray bottle
Cutting board & sharp knife
🔥 Step-by-Step Instructions
This is a classic two-stage smoke: we start unwrapped to build bark, then wrap to power through the stall and finish the cook.
1. Prep the Roast
Start with a trimmed, 3–4 lb chuck roast. Pat it dry with paper towels to remove excess moisture. Rub it down with yellow mustard—this helps the seasoning stick and adds a touch of tang.
Next, apply your rub. This isn’t the place to go mild—season aggressively. Chuck can handle bold flavors, so make sure every side gets coated.
Let the roast sit at room temp for 30 minutes while your smoker comes to temp.
2. Set Your Smoker
Preheat your smoker to 250°F. This is the sweet spot for rendering fat without drying out the meat. Use oak or hickory wood for that deep, traditional smoke profile, or mix in a little cherry for a hint of sweetness.
Place a water pan in the smoker if you have one—it helps keep humidity up and prevents your bark from drying out.
3. Smoke It Low and Slow
Place the roast directly on the grates, fat side up if there’s a visible cap. Close the lid and let it ride. Every hour or so, give it a light spritz with beef broth or rendered tallow. This helps the surface stay tacky for bark development and adds a layer of richness.
Continue smoking until the internal temperature reaches 165°F. This usually takes 3–4 hours, but go by temp, not time.
4. Wrap It Up
Once the roast hits 165°F, it’ll likely enter the stall—a point where internal temp plateaus while moisture evaporates from the surface. This is where you wrap.
Use butcher paper if you want to maintain a firmer bark, or foil if you prefer extra moisture retention and a softer finish. Wrap it tight and place it back in the smoker.
5. Finish Strong
Keep smoking the wrapped roast until it reaches 200–205°F internal and passes the probe test. You want a feel like “warm butter”—a smooth glide with little resistance. Don’t rush this step. It’s where the magic happens.
Once it’s ready, pull it from the smoker and let it rest for at least an hour in a warm cooler or oven (turned off). Resting is crucial—it allows juices to redistribute and the texture to set.
6. Slice or Shred
Unwrap and transfer to a cutting board. Depending on your goal, you can:
Either way, don’t forget to drizzle some of those rendered juices back on top. That’s liquid gold.
💡 Pro Tip: Save Those Juices
The liquid inside your wrap is loaded with fat, collagen, and flavor. Skim off the fat or stir it in—it makes a perfect dip, drizzle, or even a base for BBQ sauce. Some folks go the extra mile and blend it with a little vinegar and hot sauce for an au jus-style finisher.
🧊 Leftovers That Rock
Cooked too much? Lucky you.
Storage:
Fridge: Store meat in an airtight container with a bit of its juice. Keeps well for 4–5 days.
Freezer: Wrap tightly in foil or vacuum seal and freeze in meal-size portions. Thaws and reheats beautifully.
Reheating:
Use low oven temps or a covered skillet on the stove. Add a splash of broth or leftover juice to bring back the moisture. Avoid the microwave if you can—it tends to zap the tenderness.
🍔 Ways to Serve It
The possibilities are endless, but here are a few tried-and-true crowd-pleasers:
Loaded baked potatoes
🔥 Final Thoughts
Smoked chuck roast proves you don’t need a massive brisket or a deep wallet to turn out phenomenal barbecue. With a little time and love, this humble cut becomes something transcendent—tender, juicy, smoky, and packed with flavor.
Whether you’re a weekend warrior or a weekday pitmaster, this is a recipe you’ll come back to again and again. It’s simple, satisfying, and guaranteed to make you look like a seasoned pro.
So fire up that smoker, grab a chuck roast, and get ready to impress your crew. Because in the world of smoked meats, this underdog cut punches way above its weight. 🥩💨
